First steps
Motion time lapser is very simple to use. Let's try to do something simple like adding a movement left to right.
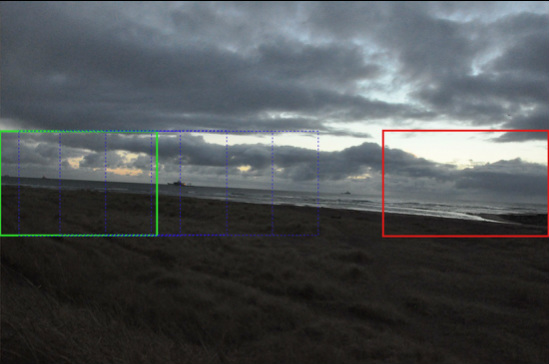
Motion time lapser will loop through all the pictures in the origin folder. It will use their name to sort them. This is important: if they are not named chronologically, the results will be unexpected.
Motion time lapser will crop the green rectangle area from your first picture and save it in the destination folder. Then, it will crop the next blue rectangle from the second picture. It will carry on cropping areas located more to the right as we advance in the process. Finally it will crop the area limited by the red rectangle from the last picture in your folder and finish.
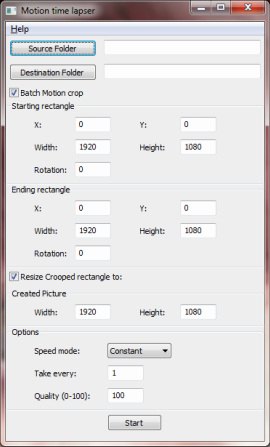
- Set the source folder to the folder where your pictures are located.
- Set the destination folder to the folder where you want to put the images after cropping them.
- Define the start rectangle (green in the picture) and the ending rectangle (red). You can use any image editor to check the X, Y, Width and Height values. In this example the only difference between the start and end rectangles is the X axis.
- Select the movement type, in this case we will select "constant speed".
- Resize all the pictures to the final size of the pictures and choose the quality.
- Click Start and the images will be created in the destination folder with the same name they have in the origin folder.
Motion time lapser will loop through all the pictures in the origin folder. It will use their name to sort them. This is important: if they are not named chronologically, the results will be unexpected.
Motion time lapser will crop the green rectangle area from your first picture and save it in the destination folder. Then, it will crop the next blue rectangle from the second picture. It will carry on cropping areas located more to the right as we advance in the process. Finally it will crop the area limited by the red rectangle from the last picture in your folder and finish.
|
|
Let's take a look at what we get when we use the pictures in the destination folder to create our time lapse.
|
|
This is just the beginning! we have only changed the X axis for this effect.
If we change the Y axis, we can get diagonal movements. Changing the width and the height, we will add the zoom in, zoom out effect and we can also change the rotation of the picture if we want. We have three options for the movement of the time lapse:
|
What else can I do?
You are free to do whatever you want. Here you have another examples.
To the left, the starting and ending rectangles are centred in the same pixel but the width and height change giving us the zoom out impression.
To the right, we rotate at constant speed from 0 to 720 degrees and it looks like I've put my fish in the washing machine!
To the left, the starting and ending rectangles are centred in the same pixel but the width and height change giving us the zoom out impression.
To the right, we rotate at constant speed from 0 to 720 degrees and it looks like I've put my fish in the washing machine!
|
|
|
Advanced options
Don't get scared, making cool time lapses with Motiontimelapser is easy. The best thing about it is that you can take your time and think about what you want.
With the very expensive motion control devices, you can't change the motion of the camera after the time lapse was taken. In this example, I used four cycles to create the time lapse. I decided to follow a boat that it was moving during the sunrise. I wouldn't be able to do that with a mechanical motion device because I didn't know that it was going to happen in advance.
With the very expensive motion control devices, you can't change the motion of the camera after the time lapse was taken. In this example, I used four cycles to create the time lapse. I decided to follow a boat that it was moving during the sunrise. I wouldn't be able to do that with a mechanical motion device because I didn't know that it was going to happen in advance.
- First cycle is an static rectangle and lasts about 3 secs, 72 pictures. Starting and ending rectangles were the same.
- An acceleration from the end of the first cycle, to the right and zooming in at the same time. Be aware that if you change the ratio of the rectangles, you will stretch or shrink the final picture. I didn't do that in this case.
- Constant speed to the right following the boat until we reach the right margin
- Keeping the right margin static, move the left all the way to the top left and give all width and height of the picture to finish with a wide view of the sunrise. This was made at accelerated speed.
